All fun and games
Beverage photography is great fun, but very challenging technically. Think of unwanted reflections, melting ice cubes, foam and condensation disappearing with the speed of light, dust specks visible everywhere, and those gnarly specular highlights in the glass. It takes quite some knowledge of studio lighting, a handful of tricks up one’s sleeve, lots of practice, and even more patience to get it right. If you want to give it a try, shooting cocktails is a good place to start. I love to shoot cocktails as they are very diverse and more manageable than, for example, beer. It’s easier to place a cocktail in the scene than a bottle of wine. They are also more forgiving if your light isn’t perfect, which isn’t the case with wine. So, let me take you behind the scenes!
Before the party begins
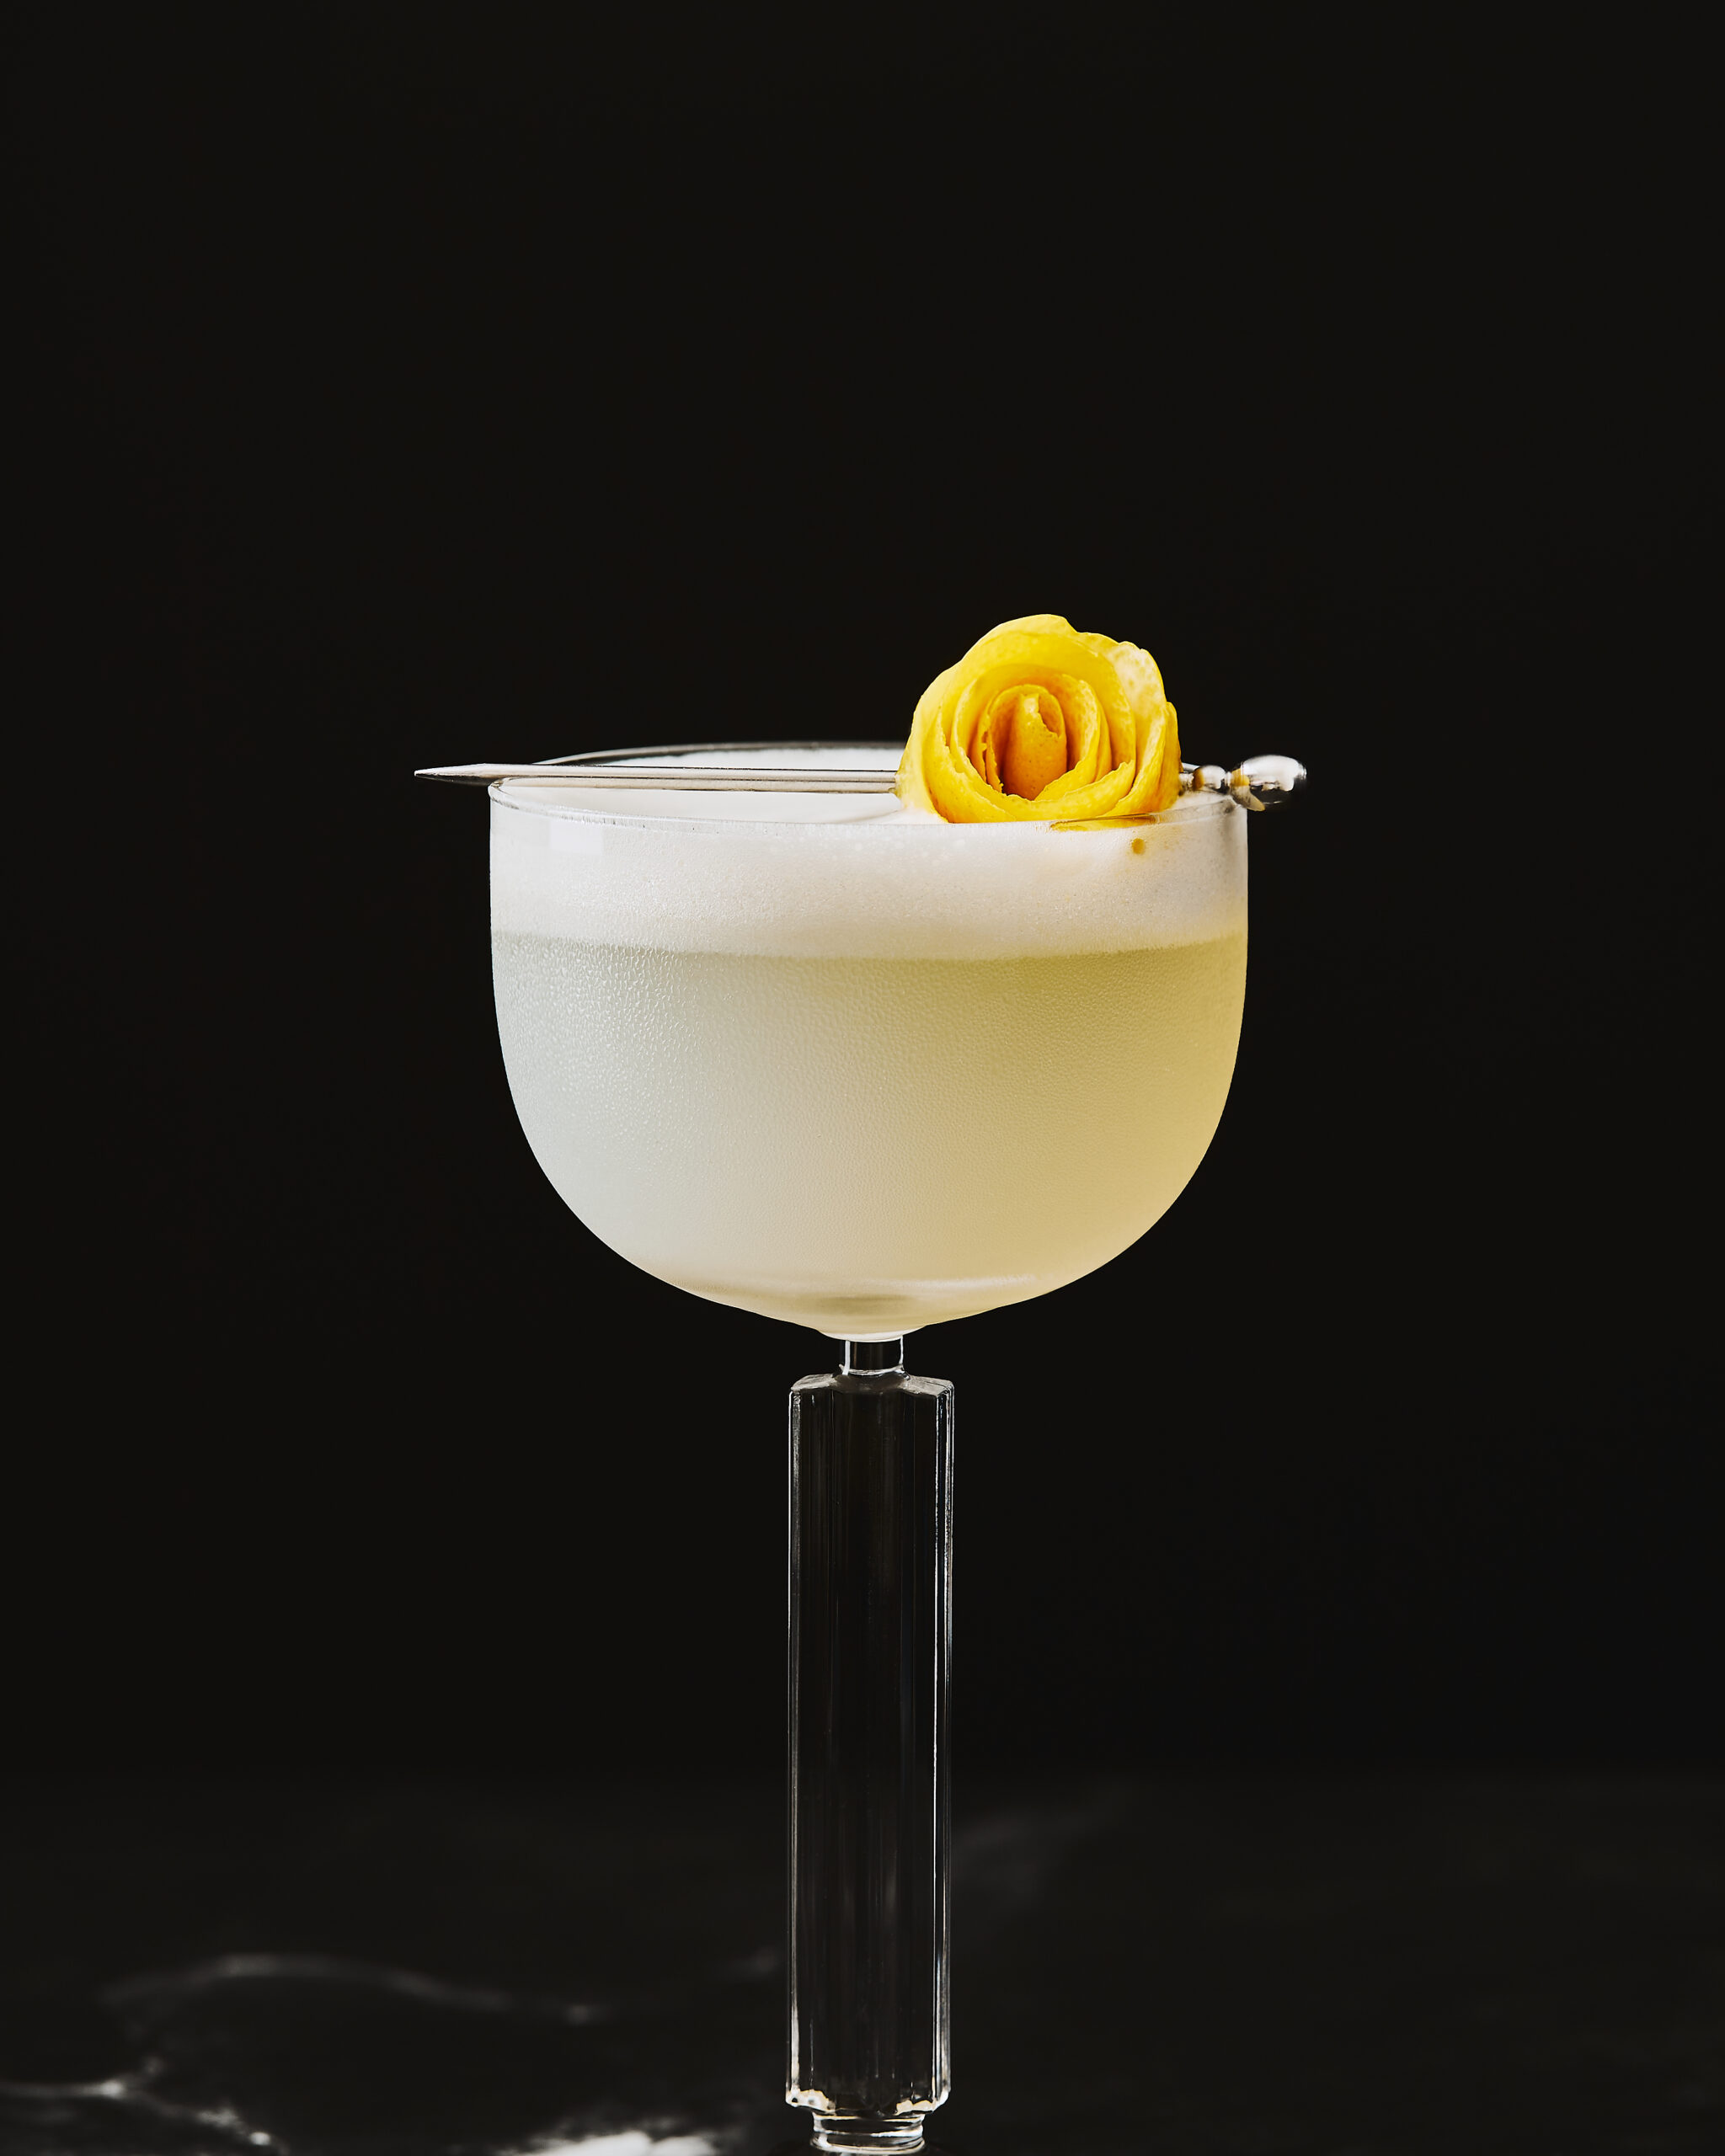
Today I’ll be breaking down my photo shoot of a vegan version of the White Lady cocktail. We start by setting up the scene and choosing the backdrops and the props. Next, we set up the camera and the lighting. Lastly, we add the drink to our scene.
This cocktail is very light in color, so I chose dark backdrops for a good contrast. Always test ahead of the shoot how your cocktail presents itself in a chosen glass. Possibly, you will need to make a little extra to make sure the glass is nicely filled. Place an empty glass in your scene to test the light.
The process of finding the right light takes a lot of time and patience. The options are endless and differ depending on the environment you’re shooting in and the look and mood you’re going for. Typically, drinks are shot with 1-5 lights and a variety of modifiers, like strip softboxes, diffusers, snoots, picolite, etc. I usually shoot with one to three lights because of the limited space in my home studio. I often use acrylic mirrors to bounce the light onto the front of a drink or a bottle. Of course, this is not as precise as a Picolite with a Fresnel spot.
Shooting drinks with strobes really is your best option, as you will need a controlled environment where light temperature and intensity won’t change. Strobes are also powerful enough for all those pour and splash shots when you need a fast burst of light. Use tethering software like Lightroom or Capture One to see your photos on a big screen in real time for perfect composition and focus. Trust me, once you do, you will never want to go back to what I call “shooting blind”. You can learn about tethering in this comprehensive video.
That being said, you don’t need all the fancy equipment to start with beverage photography; you can make perfectly nice pictures with one strobe or with natural light. But do me a favor: use a tripod.
Pour the drink into the glass only when everything else is ready, and start shooting. You may still need to adjust something or refocus. If you’re photographing real condensation like I did here, you will need to be quick about it.
Let’s get it started in here
For this shoot, I chose a strip softbox to get a narrow beam of light, which allows me to light the drink without getting too much light on the background. I placed it behind a diffusion material, as far as I could from the scene, and turned it at an angle to feather the light, to create a soft light. The Lee diffusion roll is mounted on a C-stand.
My camera is on a tripod and connected to the computer with a tethering cable. I always shoot tethered in Capture One when in the studio. It’s very comfortable and practical. It gives me certainty when it comes to shooting at a shallow depth of field and focusing on fine detail. I can also see instantly if there are any blown highlights (and if possible to recover) or if I missed any detail, which is impossible to see through the viewfinder of the camera.

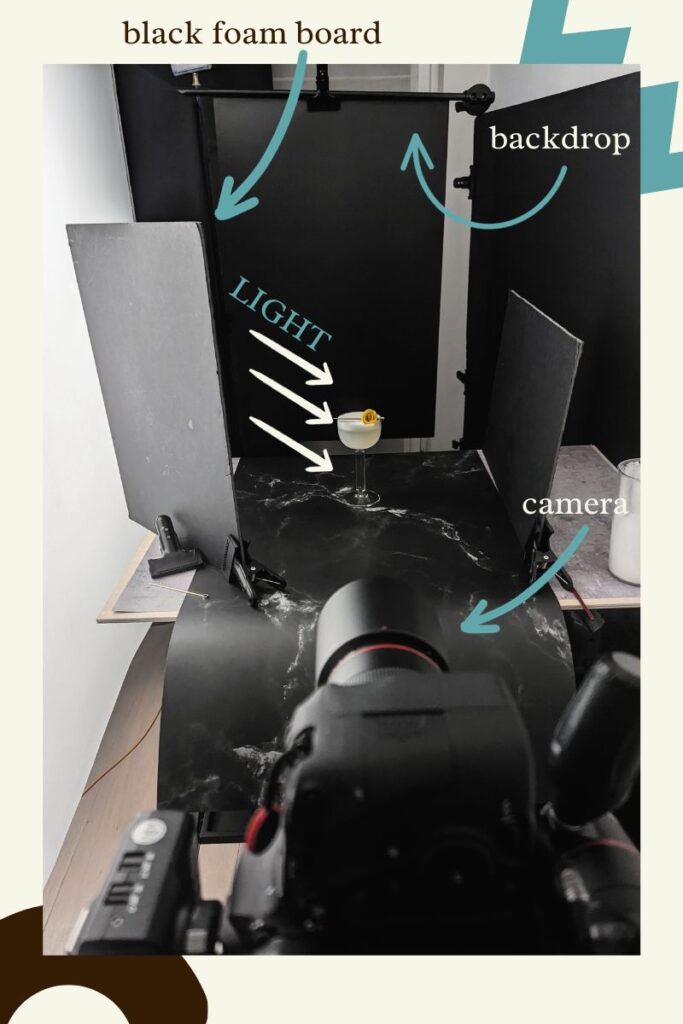
The camera is at an almost straight-on angle, looking at the cocktail slightly from the top to show a bit more of the foam. I used a 100 mm macro lens to be able to get close to the subject for an epic result. I trigger the camera with a remote control or through the tethering software.
In the back, you can see a black vinyl backdrop mounted on a lamp stand with an extension arm. The table surface is a PVC black marble. I placed several black flags (two large and two small ones) to block the light from the surface and the background. If you don’t do this, it will result in a washed-out and fake-looking picture.
I managed to block most of the light, and I refined it further in post-production with curves and levels.
Afterparty
I spend a lot of time tweaking the light, usually hours. Setting up the lighting is the most important part of the photo shoot and shouldn’t be rushed. My vision for this shoot was to have dark surroundings with only the glass illuminated. I try my best to get it in the camera for optimal results. It was a struggle to get enough light on the stem of the glass and to keep the lemon zest rose from being overexposed.
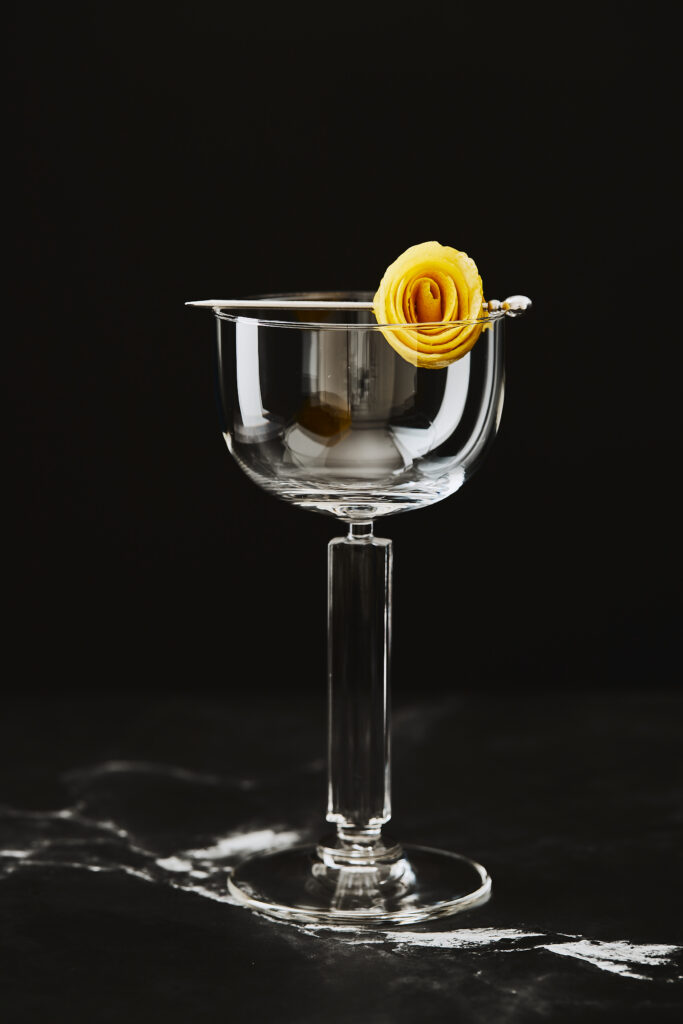
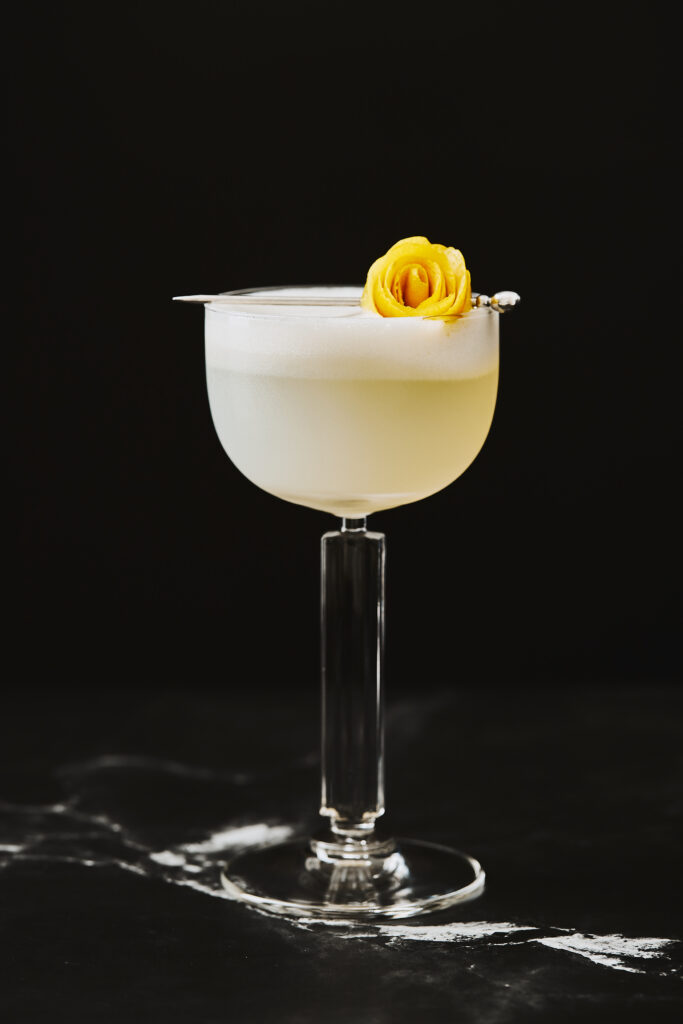
As you can see in the picture on the left we got a lot of unwanted reflections. A glass is basically a lens; you can see the whole room in it. However in the picture on the right you hardly see any reflections. It’s because of the cloudy drink and condensation, which gives the glass a matte look.
So, that was easy! It’s a very different story with clear drinks, but I’ll tell you how to deal with that some other time.
Last call for drinks
I created the final image using focus stacking, so I could have more in focus while photographing at a shallow depth of field. Focus stacking isn’t always necessary, but it’s an essential technique in beverage photography that you can’t go without.
In Capture One, I added contrast with blacks and whites, reduced the highlights, and opened up the shadows a little bit. I adjusted the RGB curve, Luma curve, and levels for the dark and moody look. Next, I changed the white balance and did some color correction. I also added a bit of clarity and sharpening. In Photoshop, I composited four pictures with different focus points.


That’s it for today. Next time you’re watching beverage photos online, look carefully; sometimes you’ll see the photographer in the reflection. It’s hilarious!
Take a look at my drinks portfolio for more cocktail pictures.
Bonus!
As a token of appreciation for reading my blog post, I have this bonus recipe for you.
- 50ml gin
- 20ml triple sec
- 10ml lemon juice
- 10ml simple syrup
- 15ml aquafaba
Combine all the ingredients in a cocktail shaker and shake it, shake it, shake it real good, for at least 20 seconds, until the aquafaba is emulsified. Add ice and shake again until the outside of the shaker feels very cold. Strain into a chilled cocktail glass.
Cheers!

you said: